For the last few years I have been making my own cabinet pull hardware. My original reason to make them myself spawned from seeing the high costs to buy them pre-made. Granted a lot of the “appliance style” pulls I have seen were either solid aluminum or stainless steel; I couldn’t justify $15-25 each for hardware for my home and shop. I not only like the look to this style of pull hardware, but I also like its full length design. I like going to grab for a door or drawer and having a large area in which to grasp from any direction. I feel as though these are the little things, if quantified, that add up to many minutes (if not hours) wasted in the shop. Will changing to a larger drawer pull afford you extra time in the shop? Absolutely not. But If you can make your workflow more efficient it is one less thing to get distracted from. Either that or I’m trying to justify not screwing in a screw and calling it a pull.
I ended up purchasing end caps because I liked the finished look as well as I wanted to speed up the process. I have outfitted over 30 doors/drawers in my shop this way. Here is a link to where you can get the plugs for 1/2″ EMT electrical conduit. They have plugs for other sizes as well.
Plastic End Caps For Handles – the part# for the caps I used with 1/2″ tubing is C24-U2 – ad “BK” at the end of the part number for black caps – NOTE: that part number says 3/4″ caps, those are the correct ones for 1/2″ EMT and refer to the EMT’s outside diameter.
I used to make the stand-offs out of the same electrical conduit as the pulls themselves, but I have found slightly undersized CPVC or PVC pipe to be much easier to work with. One of the main benefits to my design is cost. If you use the supplied link for the caps each drawer pull comes out to be less than $1 each. If you were to leave the ends open or fill them with wood, glue or epoxy then your cost would drop to less than 50¢ per pull. Flexibility is also great with this design. You can cut the conduit to any length desired, paint them any color, use larger diameter material, adjust the standoffs to whatever size you want or you could experiment with other materials, such as copper. I think copper handles would give whatever your working on a great steampunk look.
The following supplies & tools are needed to make the drawer/door handles:
- scrap piece of 2×4 approx. 24″ long
- hold-down clamp
- hacksaw or tubing cutter
- 11/16″ hole saw
- 8-32 tap & #29 drill bit (can be purchased as a pair)
- 8-32 screws (length will depend on stand-off length and door thickness
- 1/2″ EMT electrical conduit
- 1/2″ or slightly smaller PVC or CPVC pipe
- A PVC tubing cutter makes cutting the PVC easier but is not required
Using your table saw set to 45°, make a “V” channel the length of the 2×4. Make it off to one side of the face of the 2×4. This will act as the holder for the PVC and conduit.
Attach the hold down clamp with a few screws so that the clamping pad centers on the “V” groove.
There are various ways in which you can cut the electrical conduit. I prefer the tubing cutter as it leaves a straight & clean cut. Length of the handle will depend on your application. When spinning the conduit in the tubing cutter, make sure that the cutting wheel stays on your mark and doesn’t spiral down the tube.
Clamp the hold down jig you made to your drill press table. Make sure that the hole saw bit lines up in the center of the “V” groove.
Clamp down the PVC pipe and drill a 11/16″ hole through the pipe. The off-cut will make a standoff and the left hand portion can be cut to desired length to make a second standoff. This is where the PVC cutter comes in handy. You can use a hacksaw too.
Clean up both ends and remove any burrs. You can do this with a file, sandpaper or sharp knife.
You can see from this picture the 11/16″ hole saw makes the perfect curve diameter to butt up next to the conduit.
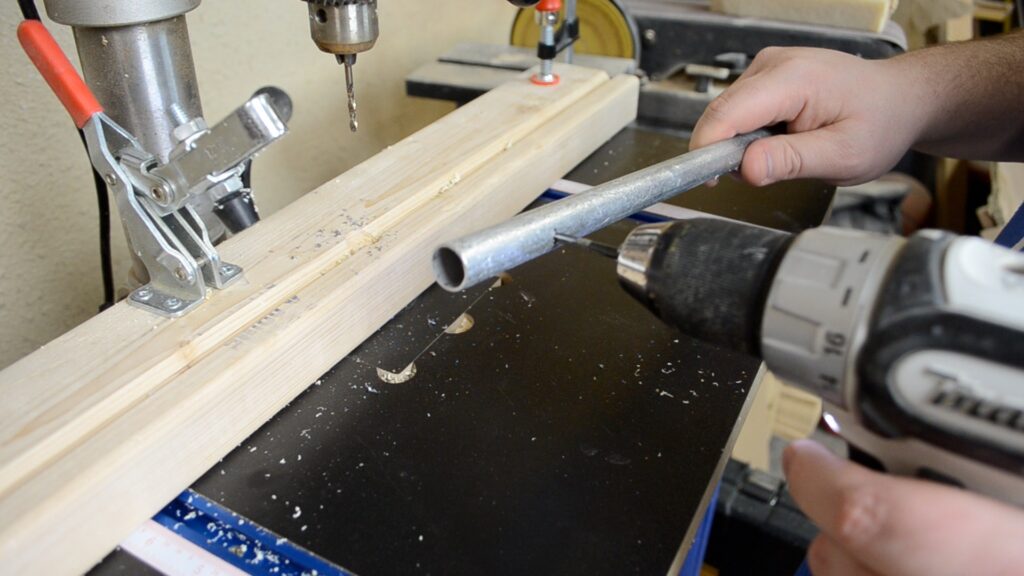
Drill one #29 hole on both ends of the electrical tubing. Make sure that both holes line up along the pipe. You may be able to get away with using 10-24 screws and tap but I like using 8-32’s because the side wall of the conduit is rather thin.
Run the tap through the holes. Backing it in and out a couple times completing the threads.
Give all of the parts a quick paint job in the color of your choice.
The plastic end caps I used are available online. I provided a link at the beginning of this article. #C24-U2-BK for 1/2″ EMT
Center and square up the end cap in the pipe, and a quick blow from a mallet at the other end drives them into place.
Pre-drill holes for the attaching screws in whatever door or drawer you’re working on. The holes in the wood should be the same distance apart as the tapped holes in the conduit. Screw length will depend on how long you made your standoffs and your drawer/door thickness. If the screws are a bit short or you are using false drawer fronts, consider counterboring the screw head to either gain a little screw length or to make sure the screw head doesn’t interfere with your drawer front.
Start the screws by hand making sure not to cross-thread the screw. Adjust the handle and standoff as you tightening the screws keeping everything lined up. Tighten securely.
 I came up with this design to combat expensive hardware prices as I probably have over 50 drawers in my shop. Thanks for looking and always questions and comment are always appreciated. Have Fun!






18 Responses
Nick, the link for the web site appears to be broken. I did find this link, which may be the same place, but I don’t know what item to look for. http://www.outwatercatalogs.com/lg_display.cfm/catalog/Master_Catalog_Vol_42/page/270 (Page 270 was not the same item.)
I think I fixed, hopefully.
The link to the plastic end caps is broken (“Please contact system adminstrator(sic) “).
It may be just down for maintenance (spell checking?) so I will check later.
I hope I fixed it. Thanks for the heads up, I appreciate it.
Genius!
Thank you, I really appreciate that!
Awesome Idea!! Can’t wait to use it but just one question. You used 1/2 in conduit but 3/4 in plugs how did they fit? Did any of them break because they were to big?
thank you – they make it confusing – 1/2″ EMT conduit outside diameter is approximately 0.70″ and the plug end is around 0.75″ but the fins that hold the plug in place are a fair amount smaller – it is a snug fit but it works – hope that helps
Nick, I love these handles both aesthetically and financially. I can’t imagine what you’d have to pay for handle that big and nice. $$$$$$$$? Keep up the great work. P.S. Love the humor too.
tons of money for commercially made ones – thanks Rod!
Would you know what size hole saw to use for 3/4″ conduit and pvc to make the fishmouth in the pvc?
If you choose to go with 3/4″ conduit instead of 1/2″, I would use a 1″ bit for the stand-offs
Nick.. Love the draw pulls. I tried to get some of the caps, but the number is not good. Need help!
I already answered your comment on youtube yesterday regarding that – I tried it and link and part number in the article work – keep in mind the “BK” is the color
Nick,
Awesome drawer pulls! Can you make some for me? I need 10.
Amy
thanks – It’s a DIY project, lol
Hi Nick. Great idea. I am trying it out but using the hole saw to cut the PVC jams the hole saw up pretty good and pretty quick and its a real pain to clear. Did you find that? Thanks again
occasionally but it wasn’t a huge issue for me – I would try and make the cut feed rate a little slower and see if that helps